
Progressive Weight Shift & Power Drill — TRX Rip Trainer
Generating power in the golf swing isn't just about rotating faster. The body needs to create force in the correct order and then efficiently transfer that force from the ground, through the lower body and core, and ultimately into the arms and club.
This five-level progression teaches that sequence one piece at a time.
The Progression
- Level 1: Shift
- Level 2: Shift + Resistance
- Level 3: Shift + Lead-Leg Drive
- Level 4: Shift + Drive + Core Rotation
- Level 5: Shift + Drive + Rotation + Speed
Don't rush to Level 5. The quality of the final movement depends on mastering the movements that come before it.
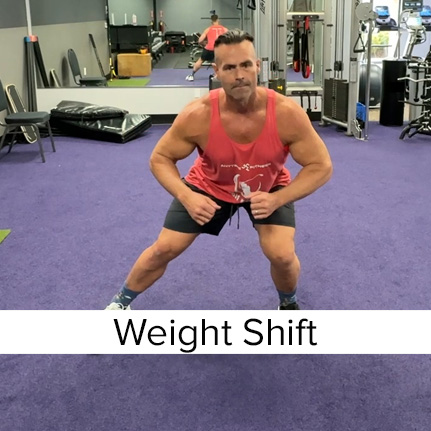
Level 1 - Weight Shift Step
Focus: Learn the Shift
Before adding resistance, rotation, or speed, we first need to establish the ability to move efficiently toward the lead side. This first drill may look simple, but it establishes the foundation for everything that follows.
Recommended Programming
Recommended Sets & Reps
Level 1: 2-3 sets of 12-15 repetitions
Weight Shift Instructions
- Begin in an athletic stance with your feet approximately shoulder-width apart.
- Maintain a slight bend in the knees and hips.
- Keep your chest tall and your spine in a strong athletic position.
- Initiate the movement by stepping toward the lead side.
- Allow your body weight and pressure to move with the step.
- Land firmly into the lead foot while maintaining balance.
- Feel yourself become supported by the lead leg rather than simply leaning toward it.
- Pause briefly and establish a stable finish.
- Return to the starting position and repeat.
Front View
What You Should Feel
You should feel pressure moving into the lead foot and leg while maintaining control of your torso. Think of this as moving your body onto a new platform. Once you've shifted, the lead leg becomes the platform from which we will eventually create force.
Tips
- Stay Athletic: Maintain a slight bend in the knees and hips rather than standing completely upright.
- Move the Body: Shift your entire body toward the lead side rather than simply reaching with the foot.
- Find the Lead Foot: Feel pressure firmly established underneath the lead foot.
- Finish Balanced: You should be able to pause at the end without losing your balance.
Common Mistakes
- Reaching Only: Stepping with the foot while leaving most of your body behind doesn't create a true weight shift.
- Leaning: Don't simply tilt the upper body toward the lead side.
- Poor Balance: If you can't control the finish, slow the movement down.
- Rushing Ahead: Don't add rotation yet. First learn the shift.
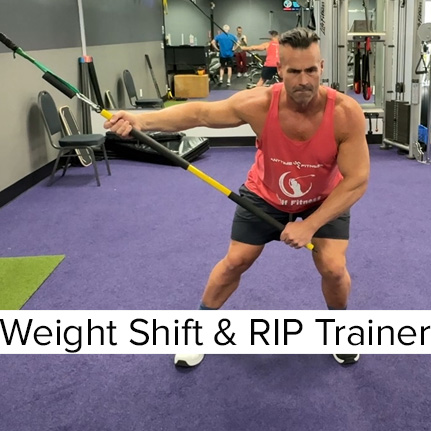
Level 2 - Weight Shift with TRX Rip Trainer
Focus: Control the Shift Against Resistance
Now we introduce the TRX Rip Trainer.
The resistance will naturally try to pull you away from the direction you're moving. Your job is to perform essentially the same weight shift you learned in Level 1 while maintaining posture and control. We're beginning to teach the body how to move against resistance without losing position.
Recommended Programming
Recommended Sets & Reps
Level 2: 2-3 sets of 10-12 repetitions
Weight Shift with the TRX RIP Trainer Instructions
- Set up the Rip Trainer so the resistance is pulling from the trail side.
- Begin in the same athletic stance used in Level 1.
- Hold the Rip Trainer securely while keeping the torso stable.
- Establish light tension before beginning the movement.
- Step toward the lead side.
- Allow your body weight and pressure to move into the lead foot.
- Resist the tendency of the Rip Trainer to pull you back toward the anchor.
- Establish a strong, balanced lead-side position.
- Pause briefly before returning under control.
- Repeat while keeping the movement smooth and deliberate.
Front View
What You Should Feel
You should feel the lead leg accepting your body weight while your core works to control the resistance from the Rip Trainer. At this stage, the Rip Trainer isn't there to make you rotate harder.
It's there to make you control the shift.
Tips
- Start Light: Use enough resistance to feel the Rip Trainer without allowing it to dictate the movement.
- Brace the Core: Maintain abdominal tension as you shift.
- Stay Centered: Keep your chest and pelvis moving together rather than allowing the upper body to fall toward the target.
- Control the Return: Don't let the Rip Trainer pull you back to the starting position.
Common Mistakes
- Too Much Resistance: Excessive tension can change the movement and prevent a clean weight shift.
- Early Rotation: Don't turn this into a swing yet.
- Getting Pulled Back: Maintain control against the Rip Trainer throughout the movement.
- Losing Posture: Avoid standing up or excessively bending forward during the shift.
Level 3 - Weight Shift + Lead-Leg Drive
Focus: Use the Ground
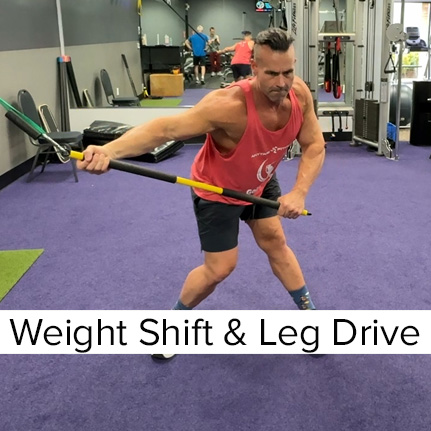
Now we're going to turn the weight shift into force. Once pressure has moved into the lead foot, the lead leg begins driving into the ground. This distinction is important:
First we get into the lead side. Then we use the lead side.
Don't simply jump or push immediately. Establish pressure first and then drive.
Recommended Programming
Recommended Sets & Reps
Level 3: 2-3 sets of 10-12 repetitions
Weight Shift & Leg Drive with the TRX RIP Trainer Instructions
- Begin in the same athletic position used in Level 2.
- Maintain tension through the Rip Trainer.
- Instead of stepping, just shift your weight toward the lead side.
- Establish pressure through the lead foot.
- Once the lead foot is firmly planted, push forcefully into the ground through the lead leg.
- Allow the lead leg to extend naturally as force is created.
- Maintain core stability while the lower body produces the movement.
- Finish in a strong, balanced position.
- Reset and repeat.
Front View
What You Should Feel
You should feel a clear sequence:
Pressure moves into the lead foot → the lead leg accepts the load → the lead leg pushes into the ground.
The shift creates the position. The leg drive creates the force.
Tips
- Plant First: Establish the lead foot before aggressively driving through the leg.
- Push the Ground: Think about pushing into the floor rather than simply straightening the knee.
- Stay Balanced: Power should not cause you to lose control of the finish.
- Feel the Sequence: There should be a noticeable difference between the shift and the drive.
Common Mistakes
- Driving Too Early: Pushing before you've established the lead side can disrupt the sequence.
- Just Straightening: Don't simply lock the knee. Produce force through the entire lead leg.
- Jumping Up: The movement should be athletic rather than becoming a vertical jump.
- Skipping the Shift: Don't become so focused on leg drive that the original weight shift disappears.
Level 4 - Weight Shift + Leg Drive + Rip Trainer Swing
Focus: Transfer the Energy
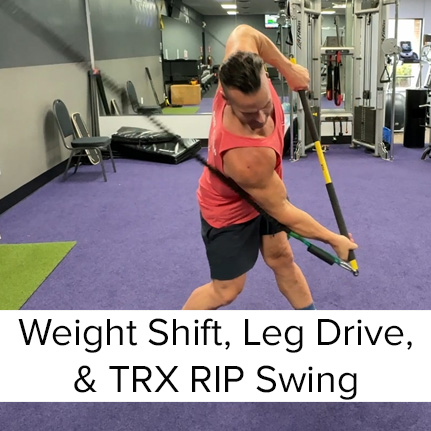
Now we connect the lower body to the upper body. The weight shift and lead-leg drive remain exactly as they were in Level 3, but now we're allowing that force to continue upward through the torso. As the lead leg drives, rotate the torso and accelerate the Rip Trainer across the body.
The key here is not pulling harder with the arms. The Rip Trainer should accelerate because the body underneath it is producing and transferring force.
Recommended Programming
Recommended Sets & Reps
Level 4: 2-3 sets of 8-10 repetitions
Weight Shift, Leg Drive, & Swing with the TRX RIP Trainer Instructions
- Begin in your athletic starting position with tension on the Rip Trainer.
- Initiate the movement with the same weight shift used in the previous levels.
- Plant firmly into the lead foot.
- Drive through the lead leg.
- As the lower body begins producing force, aggressively contract the abdominals and obliques.
- Rotate the torso toward the target.
- Allow the Rip Trainer to accelerate as a result of the body's rotation.
- Let the arms follow the movement rather than initiating it.
- Finish in a strong, balanced position.
- Reset completely before beginning the next repetition.
Front View
Side View
What you should feel
You should feel the movement beginning at the ground and traveling upward.
The lead leg produces force, the torso begins rotating, and the abdominals and obliques strongly contract to accelerate the upper body.
This is where the individual pieces start becoming one athletic movement.
Tips
- Core Focus: Feel the abdominals and obliques accelerate the torso rather than simply pulling with the arms.
- Keep the Sequence: Don't sacrifice the shift and leg drive just because we've added rotation.
- Let the Arms Follow: The arms transmit the movement; they shouldn't dominate it.
- Finish Strong: Maintain balance even as the movement becomes more powerful.
Common Mistakes
- Arm Dominant: Pulling the Rip Trainer with the arms bypasses the lower-body-to-core sequence we're trying to develop.
- Rotating Early: Don't begin the upper-body rotation before establishing the lead side.
- Passive Core: The abdominals and obliques should actively contribute to acceleration.
- Losing the Leg Drive: Continue using the lead leg even after rotation is introduced.
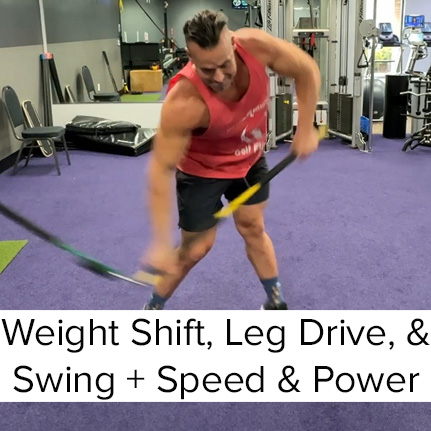
Level 5 - Explosive Rip Trainer Swing
Focus: Add Speed
Everything we've practiced now comes together. Nothing fundamentally changes in Level 5.
We simply perform the same sequence faster and more explosively.
This is an important distinction. Speed should be the result of a better and faster sequence, not random effort.
Recommended Programming
Recommended Sets & Reps
Level 5: 2-3 sets of 6-8 repetitions - As fast and hard as you can while maintaining sequence and control.
Weight Shift, Leg Drive, & Swing + Speed & Power with the TRX RIP Trainer Instructions
- Begin in the same athletic starting position.
- Establish tension through the Rip Trainer.
- Initiate the weight shift toward the lead side.
- Plant firmly into the lead foot.
- Drive aggressively through the lead leg.
- Contract the abdominals and obliques.
- Accelerate the torso rotationally.
- Allow the arms and Rip Trainer to accelerate as the final part of the movement.
- Finish balanced and under control.
- Completely reset before performing the next explosive repetition.
Front View
Side View
What you should feel
The entire movement should feel like one continuous wave of acceleration. You shouldn't feel like five separate movements anymore. The progression has taught the individual pieces. Now those pieces blend together into one explosive athletic action.
Tips
- Speed With Control: Move explosively without sacrificing the sequence.
- Full Reset: Treat every repetition as an individual power effort.
- Stay Athletic: Maintain posture and balance even at maximum speed.
- Quality Reps: Stop the set when speed or technique begins to decrease.
Common Mistakes
- Speed Too Soon: Moving faster before mastering the previous levels usually creates compensation rather than power.
- All Arms: Don't mistake faster arm movement for better rotational power.
- Losing Sequence: If everything begins moving simultaneously, return to Level 4 and rebuild the order.
- Too Many Reps: This is an explosive power exercise. Once speed decreases significantly, the set is finished.
Putting It All Together
This progression isn't simply five versions of the same exercise. Each level teaches a piece of the body's power-production sequence.
The golfer first learns where to move, then how to stabilize, then how to use the ground, then how to transfer that force through the core, and finally how to perform the entire sequence explosively.
Level 1 — Shift
Learn to move into the lead side.
Level 2 — Stabilize
Control that movement against resistance.
Level 3 — Drive
Use the lead leg and ground to produce force.
Level 4 — Transfer
Move that force through the abdominals, obliques, and torso.
Level 5 — Accelerate
Put everything together at golf-specific speed.
The goal isn't to get through the five levels as quickly as possible. The goal is to make each level automatic enough that the next piece can be added without losing what came before it.
Why Use a Progressive Approach?
Complex athletic movements are difficult to learn when we try to do everything at once. In the golf swing, the body has to shift pressure, use the ground, stabilize the lead side, rotate the torso, engage the core, and transfer that energy into speed all within a fraction of a second.
A progression allows us to slow that process down and teach the body one piece at a time.
The Progression Is Simple:
Learn it → Control it → Load it → Connect it → Accelerate it
We aren't just trying to make an exercise harder. We're teaching the body how to organize movement, produce force, transfer that force, and eventually do it automatically at speed.
What if you could play the best golf of your life while looking and feeling your best? Green Physique's Golf Wellness program is an easy-to-use, expert-guided fitness program designed to help golfers of any skill level increase strength, mobility, stability, and flexibility.
Click here to go back to the full exercise list.